8.30.2013

High Five For Friday!

You guys, I'm finally trying this link up thing! Hey now, right?! HaHa =] I've been following this blog that does it every week and now I'm joining the lovely lady behind it! YAY! Here it goes, my 5 fave things
about this week:

one
I'm finally getting used to my blonde hair! Pretty amazing considering I didn't think it'd happen =]


two
Thanks to my lovely friend Tanya I started yoga again =]. This is the cute studio we have class in. I really like it so far, although they do some weird stuff. At the end of every class we do shavasana, or corpse pose [it's where you lay down and relax and clear your mind], which is great and I love it. Anyway they give you a tiny bean bag to put over your eyes and everyone breaks out blankets. Haha I mean it's a great idea, but it doesn't last more than 5 to 10 minutes. 


three
I got to meet baby Ava. She's the little cutie we had a baby shower for a few weeks back. She's adorable and next week I'll share with you the presents I made for her =]!


four
I perfected my version of the London Fog Latte! It's 2 bags of Earl Grey Tea, 12oz water, 2 tbsp Baileys Vanilla Creamer, 1/4 cup milk, 1 tsp vanilla extract, and 2 tbsp coffee liqueur =] This is the boozy version!

source

five
Brian has this Friday off!!! I'm always so happy and thankful when we get to spend more time together =]


Linking up with Lauren for H54F today!


Happy Friday Friends!!!


8.29.2013

wedding cocktails | signage and names


 Since it is nearly the weekend, I thought it'd be great to talk wedding drinks. Where do you start when it comes to these celebratory libations? The budget, the availability, can you bring your own or does the caterer have to provide it? It all sent my head spinning when I thought about it.

Here is how to tackle this:

1. Talk to your venue and caterer to figure out if you can bring your own liquor/beer/wine.
2. In any case you will need a liquor serving license for the day, so get one of those it cost's about
$10 and you can get them online.
3. Decide if you are having signature cocktails, an open bar, or just beer and wine.
4. Figure out your signature cocktails and how many will you have. We had two, an Old Fashioned
and a Love Potion [I made the name up and really don't remember what the original was called, but
it was vodka, cranberry juice and ginger ale w/ lime].
5. Decide if you want to name your cocktails wedding related things, ex. "Something Blue", "Love
Birds", "Love Potion" and so on. These can get pretty bad and cheesy so you stay classy San Diego=]!
6. Design / pick out / buy / create in some way, signage for your drinks! You want to let your guest know what is available, rather than leave it to the catering staff to tell everybody. By bringing in your own drink menus you also create an opportunity for cute, personalized wedding detail pictures.

 These are a few drink menus I like quite a bit. You can check out our pick
at the top of the page:


And in case you have no idea where to start with cocktails, here are some delicious examples:


Rose Martini by Michelle Vantine

For more inspiration on drinks check out some of my favorite sites for wedding planning:
the knot
HUFF POST Weddings
a practical wedding


Happy Planning, Drinking, and a very happy Thursday=]!!!

8.28.2013

DIY // Wedding Invitations


It's time for some more wedding crafts. This week, it's our wedding invitations. I did some research, picked a favorite and decided it was going to be a DIY project.


Our invitation package included an invite, a details card, and a RSVP with envelope. For the floral design I used this free printable from download&print.


I bought the paper and envelopes at paper source and used Kinko's for printing and cutting [I did the cutting myself and used their large rotary cutter]. A word to the wise, make sure your paper is right for the printer you'll be using, ex. if using a laser jet printer, make sure you buy laser jet suitable paper. This is not hard to find info, but can be easily overlooked. 


I also made vellum sleeves with cream colored ribbons and a vellum overlay to go between the invitation and the details card [I may have forgotten to add them to a few invites...sorry guys=].


This is what the envelopes looked like when done. You can find a freebie download for the labels here. We also sent an invite to the president. To find out what they sent back, go here.


I ended up adding some extra postage, because of the knot on the ribbon. It turned out pretty cute and "traveled" looking.


Here is an approximate cost breakdown for 70 invitations:
Paper and Envelopes $117 [Paper Source]
Printing $15 [Kinko's and Office Depot]
Full 8.5"X11" sheet labels for labels $4 [on sale from Office Depot]
2 rolls of Ribbon $1 [from Joann]
The vellum I already had so it was free [find some for cheap here]
Total cost [without postage] $137, that's $1.96 per invitation!!! Can't beat that =]

Hope this was helpful and inspiring for any project, wedding or otherwise related!

Happy Wednesday Dolls!!!

8.27.2013

easy headband // flower power


Let's talk headbands. I got the itch to make one [or ten, don't judge=] when I saw this graffiti close to our apartment. I love the flower in her hair and thought "I can make that". I had also seen a tutorial for a braided headband  and wanted to try that out as well.


If you want to replicate this headband, this is what you will need:
an old t-shirt, or some jersey fabric
a silk flower
this tutorial by Make It & Love It for the headband
my tutorial for the flower
some pearls
needle and thread
a piece of felt
hot glue and gun


first thing, assemble your materials
second, pull up the tutorials
third, have fun
fourth, rock out your new headband


* if it's unclear, I hot glued the flower to the headband and then added a large piece of felt to secure them together and to give it a finished look=]


TA-DA!!! Cute and easy headband with a flower!

Happy Tuesday Friends!!!

8.26.2013

hair makeover

I had been growing my hair out for the wedding and was getting tired of having it long. I was excited to cut it, color it, to just do something different with it. This is what I did!


This is the "before" picture, long with some highlights under, or rather below the crown of my head.


Two days after the wedding, I cut off about 9" it was kind of a straighter U shaped cut.


TA-DA the "after", ash blonde with massive [for me] bangs! What do you think? Personally I want to go blonder =]


I asked Brian to take a picture, but I could not keep a straight face =] These are some silly ones of me.

Happy Monday Friends!

8.23.2013

Fun Finds Friday


Check out this cab! Super cute, right?! And the dishes, adorable!!! One of the things I really like about Peru are the colors, so vibrant and saturated.

Happy Friday Friends!!!

8.22.2013

creamy avocado | garlic | dip

I've been liking avocados more and more lately and it's mostly thanks to Brian and the awesome avocado dip he makes. It's healthy and delicious!


creamy avocado | garlic | dip
2 large avocados
3 cloves of garlic
juice of 1 large lime [I used 2 key limes]
salt & pepper to taste
  • In a food processor add avocado, garlic, lime juice, salt & pepper.
  • Mix until creamy and delicious! Add more salt & pepper if needed.


I eat it with pretzels, but its great on burgers, sandwiches, and to dip veggies in. It is also so much healthier then many of the dips out there =]

Happy Thursday Friends!!!

8.21.2013

bridesmaids // gifts & photos


Meet my lovely girls, I could not have done it without them!


I wanted to get them something useful and personal and fun. This is what I came up with.


A versatile, fabulous leather clutch filled with goodies!


Some vodka to keep the party going =] and an apple juice for Ashley [I hear pregnant women don't drink =]

 
I also made them some flower hair clips and a silver pendant necklace=]


As far as packaging and other goodies in the bag, here is what I used:
brown paper bags
floral tissue paper
juice boxes
small vodka bottles
granola bars
tissues for happy tears=]


I also printed thank you labels to hang on the bags. You can find those here.


Happy Wednesday Dolls!!!


8.20.2013

groomsmen // gifts & photos


I'm always interested to see what couples choose as bridesmaids/groomsmen gifts. There are so many options out there; this week I'll be sharing what Brian and I did for our wedding! Up first, the boys!


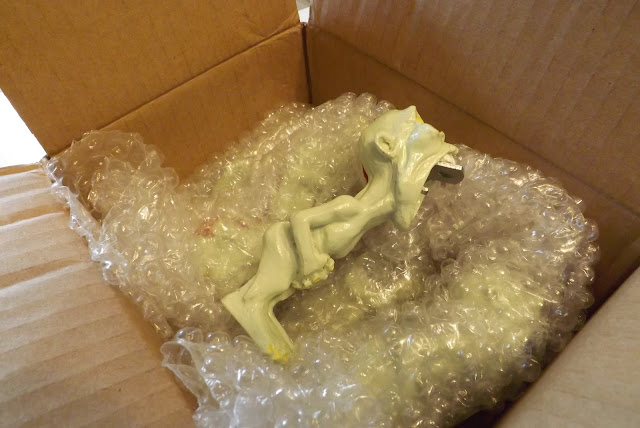
Brian is very much into beer and anything zombie related, it really is no secret. So when he showed my the groomsmen gifts, it came as no surprise =]


These guys came from Neato Shop. As far as the packaging, I used small black paper bags and black tissue paper from Joann. I made "zombie green" labels with the groomsmen's names in Photoshop and printed them on full sheet label paper, then I just cut them out and stuck them on the bags.


TA-DA!!! Cool and personalized gifts and packaging. The devil's in the details, right?!=]

And now, a few of my favorite pictures of the boys. I still laugh when I look at these.


Happy Tuesday Darlings!!!