10.31.2012

tea.cup.time


I love me some teacups! I also have an almost unhealthy obsession with photographing my ring! Everywhere. I very much wanted to share with you the new additions to my teacup collection. However, when I was looking through the pictures I took of them this past summer...my wedding ring was in almost all of them. For this, I AM sorry...


When I was in Seattle, this summer, I found myself at Goodwill, searching for teacups. It's a good place for that sort of thing.


The one with the pink flowers is sort of special, on the bottom of it was written "Made in Occupied Japan". Wikipedia told me "At the end of World War II, Japan was occupied by the Allied Powers" from 1945 until 1952, and here you thought this was a craft blog.


The white and navy blue one was made in England in 1963. It's simpler in a way, not fit for a royal visit and tea with the Queen, but for those cold afternoons when you just want to sip tea alone. Maybe. Who knows?! That's the story I'm going with.


I was feeling a picnic-tea-party kind of way.


This one is my favorite, made in England in 1975, bought at Goodwill for $1.99.
I wish these came with a note telling you whose they were and how they made it to a second hand store in Western Washington. I feel a strange obligation to save all the pretty, lost things I see. It's always been my problem.

I'd love to hear about your obsessions and treasures! SHARE.SHARE.SHARE.

P.S. total cost for all three cups: a whopping 6 bucks!!!


10.25.2012

oh!paper.beads


welcome.welcome.welcome! (oh.Effie.Trinket)
I present to you the-oh-so-anticipated PAPER BEADS!
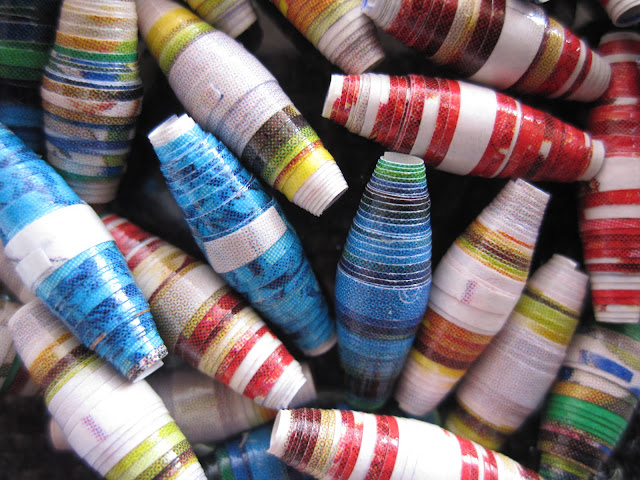
I love paper beads. They are shiny and colorful and most importantly, they are made by me! So they are just that much extra special to me. There really is something to be said about things you make with your hands, things that come from your soul more or less. Exciting things that start off  much less exciting , maybe even boring (I mean pages of a magazine+glue...booriiing). But yet they turn into pretty, shiny treasures!!!

a wee portion of my bead.collection


First! Gather your papers! I usually look through all kinds of magazines, catalogs and news papers. Once you have found THE ONE, flip it over and grab your other supplies: ruler, pen or pencil, round toothpicks, white school glue, scissors, clear nail polish (yes, that's right), and something to stick them on, to dry (I used a styrofoam tray)


Take your ruler, starting from the bottom right corner and measure 1cm. Make a mark.


Then line up that mark (using your ruler) with the top edge of the page and draw a line.

Now for the next one, measure 1 and 1/2 cm on the top side, where you connected the first line. Then draw another line going down to form your first triangle. Continue this way until you have as many triangles as you need, or until you run out of paper.


It's time to cut them up! Use sharp scissors and follow the lines. If I had a rotary blade it'd be much easier, but they don't sell those in Peru. I'm just gonna have to wait until I'm in Seattle.


 I flipped them over and look how pretty they are!


Getting carried away with the pictures here (= Take a toothpick and a triangle. Good side out, place the triangle under the toothpick and roll.it.


When you get to the end, dab some glue on the very tip of the triangle, roll it up and smear the excess glue over the entire bead.


Now stick it on the styrofoam tray and let it dry. I wait about 30 minutes... if I can.


Continue on until you have them all rolled and on the tray. When they are dry, take the clear nail polish and brush it all over the bead. Stick it on the tray again and let dry for another 30 minutes.


Take them off of the toothpicks by gently sliding them off. Put them in a glass jar and take a ton of pictures! Or at least that's what I did.


I just love how shiny they are! Stay tuned for a.paper.bead.necklace.tutorial real soon!

P.S. madmim is where I first fell in love with paper.beads

10.20.2012

pretty | silk | flowers


So here we go again with the silk flowers! I just love them. There were a couple of weeks last month, when I was obsessed with them even more than I am now. I made about twenty!


I'll show you how I made them from regular (and kind of boring) silk flowers. The first ones I made were for some braided fabric headbands and I fell in love with them. I wear them in my hair almost all the time!


The first thing you'll need is a big silk flower, or two (I did a combination of soft pink and off-white).
Now pull it off of the stem and take the plastic center out. This way you can spread out all of the petals and pick the ones you want. I took the largest ones and cut the individual petals off.


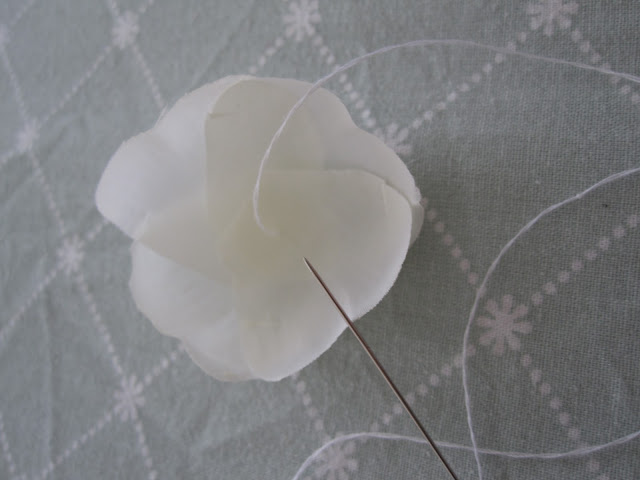
Then you gather them in the shape you want (these petals curved in, which made the the finished product look like tiny peonies) and you stitch away! You can also hot glue them, but with these, it bled through and looked funny. Just keep adding petals until you are happy with the result.


For the middle, cut out some very small ones and stitch them together separately. Add to the main one after.


To make them even fancier, I sewed a pearl in the middle of each one. Once I had the flowers put together I cut out small circles of white felt and hot glued those to the bottom.


Now they are ready to be attached to headbands, shoes, hair clips, or whatever else your heart desires!

Happy Saturday Friends!!!

10.17.2012

fancy | baby girl | gifts

There's a girl I know (Carly)...who is having a baby girl.
A few weeks ago I had the extraordinary task of co-throwing her a baby shower. I was searching high an low, all over pinterest to find unique ideas for gifts, games, treats, etc. I came upon this very classy looking (for a baby anyway) pacifier and pacifier clip. I knew that this was it. I had to make it. She had to have it. It was perfect.


From the bead store I bought
1 strand of pink glass beads
and
1 strand of white pearls
together for under 5 bucks US!

From the baby section of the grocery store
(ha I know it's weird) I bought:
paci clip and pacifier
and bonus
super cute slate colored baby ballet flats on sale
all under $16 US

The little clip


* I find supplies in the most unusual of places. There's no Michaels here =( 

First I took off the plastic chain that was used to attach the
clip to the pacifier.

From there I added the string of beads I made. I doubled up the thread and used two crimp beads to secure it on either end. It's unbreakable! I dare any baby to try and spill these beads:)


Here is what it looked like with the new "chain", next I needed to attach the pacifier to it.


I made these pretty silk and pearl flowers to go on the shoes and the clip. They turned out great, I made them out of these big silk flowers I found on clearance at Wong (our local, awesome grocery store).
More on these in the next post!!!


I sewed a piece of felt to the bottom of each one and hot glued them to the tops of the shoes and this one to the top of the pacifier clip.


TA-DA!!! Pretty cool right?! Little baby Elianna is going to be the classiest baby ever!


This is how I had to plug in my hot glue gun. plug+transformer+adapter and then outlet!!!